Back to school means back to meetings! While that phrase may not inspire a lot of excitement, here are three ways you can use tech for smoother meetings — from start to finish — this semester. Make scheduling automatic, take advantage of built-in features for easier presentations and then store and share your recordings with ease.
Easier scheduling
Sometimes, the hassle of meetings starts before the meeting itself. Finding a time to meet can be a challenge, but here are Outlook tools to make scheduling faster and easier.
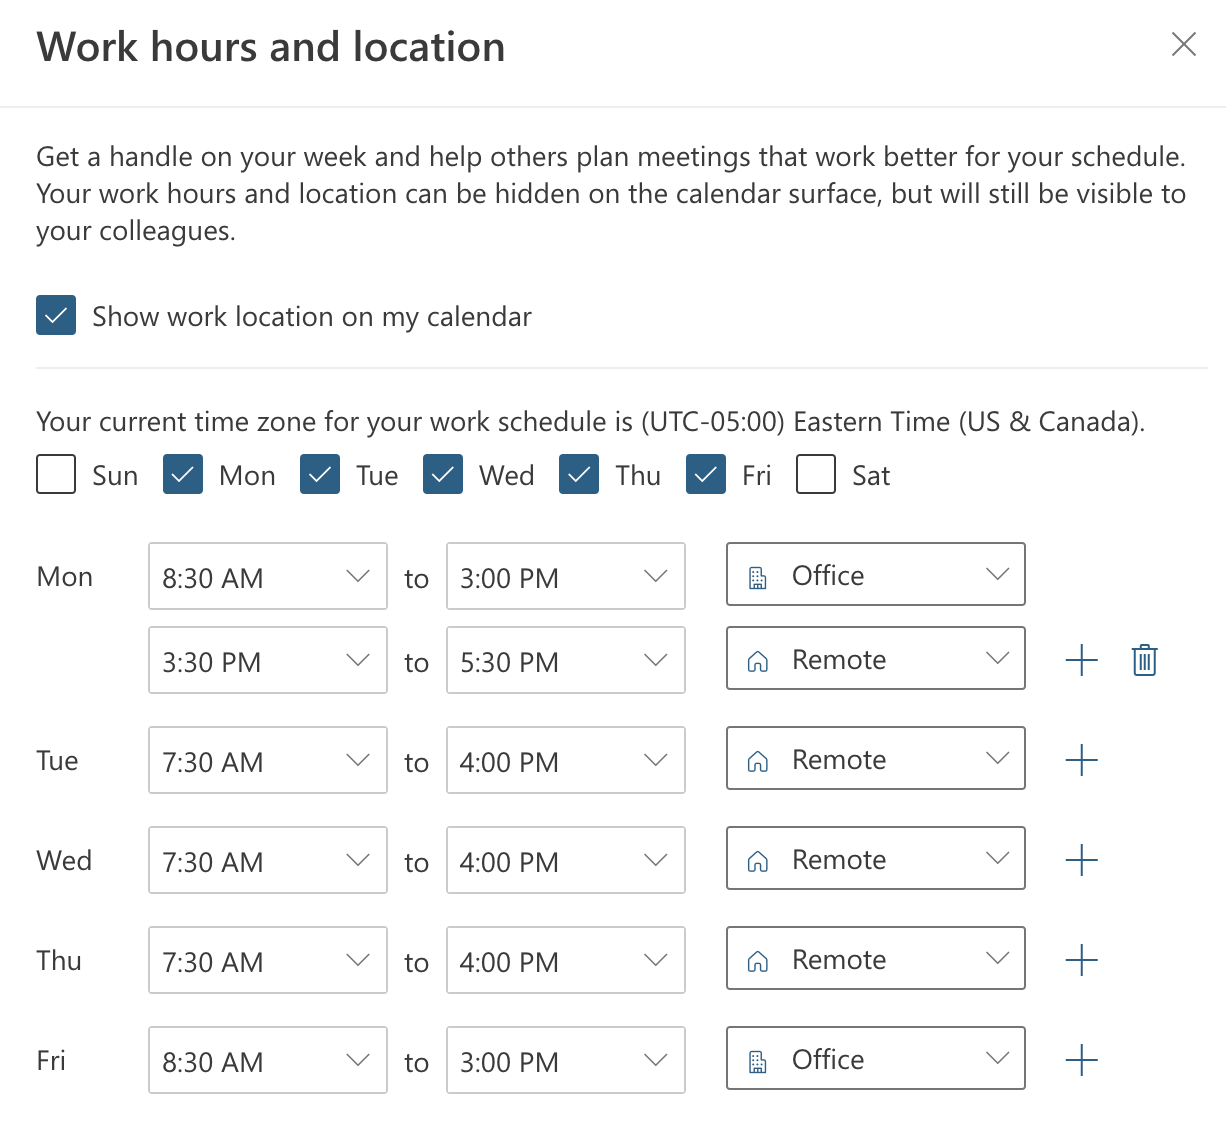
Right time, right place with work hours and location
With many people working flexible hours or hybrid schedules, it’s difficult to remember who is working where and when. Make it easier for your colleagues to book meetings at the right time and place by setting up your work hours and locations.
With a recent update, Outlook lets you set working hours and a location for each day of the week — and even multiple working blocks or locations on the same day. Previously, Outlook’s working hours were limited to the same schedule for all days and didn’t allow for split shifts.
Now, if you work a hybrid/remote schedule or you work different hours a few days a week, Outlook or Teams can reflect when and where you’re available. Your coworkers will see if a meeting time is outside your working hours and if they should book a conference room or add a meeting link instead.
Visit Microsoft support to read more about how to set up your work hours and locations. Currently, you must use Outlook on the web (known at UNC as Heelmail) to configure your work hours and location, but the schedule you set will be visible across all versions of Outlook and Teams.
Automate scheduling with Scheduling Poll and Bookings
Going beyond showing availability, Microsoft offers two built-in Outlook tools — Scheduling Poll and Bookings — that can make scheduling meetings, appointments and office hours almost completely hands off.

Microsoft Scheduling Poll (the new name for Microsoft FindTime) is a feature-packed meeting availability poll that’s part of Outlook. Start by drafting an email and include attendees in the to line. Then, open Scheduling Poll to include a selection of potential meeting times. Scheduling Poll suggests meeting times that are based on your attendees’ Outlook Calendar availability, which helps you narrow down the options.
Before you send the poll, you can select value-add features, including automatically adding tentative blocks on your calendar for the times in the poll. You can also choose to automatically schedule a meeting when attendees reach a consensus. That means that if all respondents reply and agree unanimously on a time, you’ll receive a confirmation email and a meeting will appear on your calendar — without any extra work from you.
Visit Microsoft support for full instructions on how to use Scheduling Poll. Scheduling Poll is available for Mac and Outlook on the web (Heelmail), and is coming soon for Windows. For Windows, use the existing FindTime add-on with the same functionality.
![]()
Microsoft Bookings is an easy way for people to sign up for office hours, appointment slots, interviews or consultations. With just a few clicks, the Bookings app creates a website that lets others view and schedule appointments. The tool includes free features that other services charge a premium for — like real-time calendar updates, full integration with your Outlook calendar and appointment confirmations with email and text reminders.
Visitors see open slots and pick the one that works best for them. Once they book, the appointment automatically appears on both of your Outlook calendars. For virtual meetings, you can enable adding Microsoft Teams meetings, completely automating your booking process.
You can find Bookings in your Microsoft apps launcher. Visit Microsoft Learn for in-depth tutorials on Microsoft Bookings.
For a full review of both Scheduling Poll (previously called FindTime) and Bookings, read 3 Outlook Calendar tools to supercharge your scheduling.
Two tips for smoother presentations
If you’re using Microsoft Teams to present a PowerPoint, don’t share your screen! Optimize your experience with PowerPoint Live. PowerPoint Live gives you more control of your presenter view in Teams so you can see your slides and speaker notes while still engaging with your audience with chat and video. If you’re co-presenting, they can take control and gain instant access to presenter view for a seamless transition. With PowerPoint Live, you also get some extra tools, like a virtual laser pointer, pen and highlighter. To start from Teams, select Share, then PowerPoint Live. From PowerPoint, you can select Present in Teams from the toolbar. For more details on PowerPoint Live, visit Microsoft support.
And if you’re presenting in Zoom, you can have smoother presentations too — especially when you’re co-presenting. How does never hearing the phrase “next slide, please” sound? All you need to do is enable Slide Control in Zoom. With Slide Control on, when the meeting hosts shares PowerPoint, they can choose attendees who can control the slides. These selected users are notified of their access and then are able to advance or rewind slides, even though they’re not sharing their screen. Visit the Zoom support center for more details about using slide control.
For more tech tools to improve your presentations, read a recent ITS News article: Become a better public speaker with Microsoft tools.
Better recording storage and sharing
After you’ve finished your meeting, you may need to save or share a recording. At UNC, Zoom cloud recordings are automatically deleted after 30 days. So if you need to share a meeting recording, the Zoom link may not be the best way to do it. Plus, you can do more than basic sharing if you use another tool provided by ITS — Panopto.
Panopto is the automated backup location for all UNC Zoom cloud recordings. Your recordings will be kept for two years after the last time they’re viewed, giving you a much longer viewing period than Zoom’s 30 days.
When you sign into your UNC Panopto account, you’ll see your automatic Zoom backups. From here you can:
- Rename recordings to help you find them again later.
- Create new folders and move recordings.
- Share individual recordings or entire folders.
- Delete old or unwanted recordings.
- Edit your videos, including trimming, including captions or adding additional video clips.
Learn more about Panopto at UNC.
Want more tips and tricks for meetings? ITS has another tool that can help: LinkedIn Learning. Log in for free using your Onyen and search for courses on specific software, like Outlook, or on keywords like “better meetings” to find the right course for you. Options range from one-minute quick tips to 10-hour master classes.