Imagine your life without a digital calendar … no reminders popping up on your phone, wearing an eraser down to a nub when an appointment is rescheduled, sign-up sheets for appointment slots, emailing back and forth to find a time to meet, manually copying meeting details from an email to your calendar.
… Well, even with a digital calendar, you might still be doing those last three. But built-in Microsoft Outlook Calendar tools, made possible by ITS, are here to help you save some time, frustration and maybe even erasers. Meet your new productivity boosters: FindTime, Bookings and Create an appointment from an email.
Quick links
FindTime: availability polling with advanced features
Bookings: appointment slots and office hours made easy
Create an appointment from an email: no more copying and pasting
FindTime

Finding a time to meet that works for everyone is always a challenge. You’ve probably answered a meeting poll in the past, but did you know there’s one integrated with Outlook? And that it has extra features, like automatically scheduling your meeting? Microsoft FindTime is an add-on that is automatically added to your Outlook account at UNC-Chapel Hill.
To use FindTime, start a draft email and enter your required attendees in the to line and cc any optional attendees. You can also invite attendees who don’t have @unc.edu addresses. Then click on the FindTime icon.
The icon may be displayed on your toolbar with other add-ons, hidden under a three dots menu or displayed at the bottom of the draft window on Outlook for the web.
You’ll then use a day and time picker to choose options for your meeting poll, all while seeing availability for your attendees. This way you’ll be able to quickly narrow down the number of slots you pick.
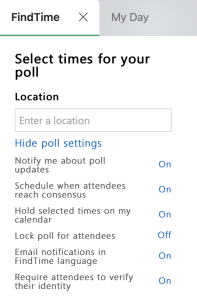
Next, you’ll see why FindTime really shines. In the settings for the poll, you can let Outlook automatically put tentative blocks on your calendar for the times in the poll, automatically schedule a meeting when attendees reach a consensus, choose to be notified of responses and require that attendees verify their identity.
After you send your poll, if you’ve configured your poll settings to be notified of responses, you’ll receive an email when people complete their votes. If you enable the setting to automatically schedule a meeting when attendees reach a consensus, and if all respondents reply and agree unanimously on a time, you’ll receive a confirmation email, and a meeting will appear on your calendar.
To see responses for current or completed polls or set default settings for all future polls, sign in to your FindTime dashboard.
Bookings
Need an easy way for people to sign up for office hours, appointment slots, interviews or consultations? Microsoft Bookings to the rescue!
The Bookings app helps you quickly create a website that lets others view and schedule appointments. The tool includes free features that other services charge a premium for, like real-time calendar updates, full integration with your Outlook calendar and appointment confirmations with email and text reminders.
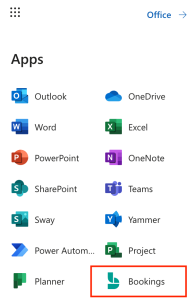
Access Microsoft Bookings through the Microsoft apps launcher, available on office.com, SharePoint or from your homepage if you’re using the Edge browser. Then connect Bookings to an existing shared calendar or start a new one. Because Bookings works on a shared Outlook calendar, it’s easy to share appointments with a team or department and reassign appointments to another staff member.
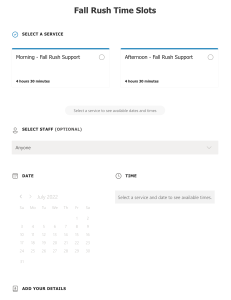
Once you have a Bookings space, you’ll be able to create custom appointments, letting people choose between services, staff or locations — for whatever types of appointments you need. For example, use Bookings for office hours and allow students to pick between virtual or in-person appointments, or add consultations for multiple staff members in one Bookings interface.
Even better, all booked appointments automatically appear on your Outlook calendar and are easily re-assigned to other staff as needed. For virtual appointments, you can choose to automatically add Microsoft Teams meetings, completely automating your booking process.
There’s also a lightweight version of the Bookings app available in Teams. Once configured, all Bookings administration can be done without leaving the Teams app.
Create an appointment from an email
When you receive an email with a Zoom link for a webinar or a meeting confirmation from a third-party system, you probably open Outlook Calendar and make a new appointment. And you likely find yourself flipping back and forth to copy and paste details and confirm that you’re making the meeting for the correct day and time.
There’s an easier way.
Using the Outlook desktop app, just click and drag the email to the calendar icon at the bottom right of the screen. This will create a new appointment containing everything from the original email. You’ll still need to adjust the date and time, but the contents of the email will automatically be included in the body of the appointment for easy reference and fewer clicks.
Depending on what version of the desktop app you’re using, you may also have a “Create an Appointment” button in your toolbar that works the same way.
Want to learn more Outlook Calendar tips and tricks? ITS has another tool that can help: LinkedIn Learning. Log in for free using your Onyen and search for Outlook Calendar, FindTime or Bookings to find the right course for you, with options ranging from one-minute quick tips to 10-hour master classes.