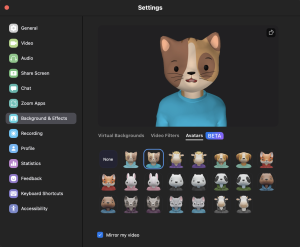
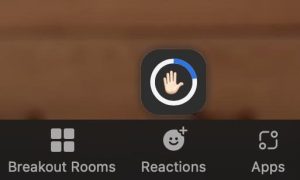
As we’ve been meeting, Zoom has added new features. A lot has changed, so here are some tips to make sure you’re getting the most out of your videoconferencing. We use Zoom for more than just meetings — holiday parties, birthdays, happy hours and team building sessions give us opportunities to have fun with our colleagues. In the early days, virtual backgrounds were the only way to add panache to your Zoom, but now there are more options to let your personality shine. Filters add an overlay to your video. Pick an eye patch for International Talk Like a Pirate Day on September 19, a mortarboard for a summer graduation party, add some lip gloss or see how you’d look with a beard. Avatars transform you, Animoji-style. Zoom tracks your facial expressions and superimposes them on a CGI animal. This lets you share facial expressions without exactly being on camera. A bunny sharing quarterly reports may not hit the right note, but a bunny singing during team building karaoke? Yes, please. Immersive view enables hosts to place participants in a virtual space, breaking them out of the virtual box. Immersive view is a fun way to make people feel more like they’re in one virtual space instead of a gallery of squares. For a party, place your colleagues on a fun background to lighten the mood. For a webinar, consider placing your panelists at the same virtual table. To use immersive view in a meeting or webinar where you are the host, first enable it in your Zoom settings, then choose Immersive View from the view options in the top corner. For detailed instructions, visit the Zoom support center. Is there something you change every time you join a Zoom meeting? Or one little thing that bugs you? Check your settings! This tip may not sound the most exciting, but it might be the one with the biggest impact. Zoom has dozens of settings to help you customize your experience. One hurdle: Zoom makes it tough to see all your options. Some settings are available in the Zoom desktop client, available by clicking your profile picture then choosing settings. Others are visible in settings on the web, accessible by clicking “more settings” in the Zoom client or by using this direct link to your settings. It’s a great idea to poke around and see if that one thing that you’d love to change is just a click away. Here are a few examples to get you started: Want to get out of your meetings faster? Uncheck the Ask me to confirm when I leave a meeting setting. Low bandwidth? You can use the Enable stop incoming video setting if you want to temporarily turn off incoming video for your view only. Feel like you’re scrambling to mute yourself when you join a meeting? Choose Mute my mic when joining a meeting instead and manually unmute yourself when you’re ready. Wish others would mute their mic when joining? Turn on Mute all participants when they join a meeting and when you’re the host, not only will everyone be muted at the start, you’ll also control if they can unmute at all Tired of jumping through hoops to add Zoom to your meeting invites? Automatically add Zoom to every meeting lets you skip a few clicks when scheduling through Outlook using the Zoom add-on. First, install the Zoom add-on for Outlook, if you haven’t already. Then, change your Outlook settings in the events and invitations tab. For step-by-step instructions, visit the Zoom support center. If you’re always fumbling to raise your hand or give a thumbs up reaction, turn on gesture recognition. Gesture recognition analyzes your video feed so when the real you gives a thumbs up on camera, the thumbs up icon reaction appears. To trigger the hand raise icon, raise your hand with your palm to the camera. When Zoom recognizes the gesture, a notification will appear. Continue holding the gesture until the notification timer ends. Currently, Zoom supports only the thumbs up and hand raise gesture. To turn on gesture recognition, open the settings in your Zoom client and scroll down to Reactions. If you’re already a power user, there’s still more you can do! Zoom has added features that enable people who run a lot of meetings to supercharge and streamline. Sometimes we do need to be in two places at once, and with Zoom, you can be (virtually, anyway). In your Zoom settings on the web, enable Join different meetings simultaneously on desktop. Once enabled, you can monitor multiple meetings, which is especially helpful if you’re running concurrent sessions or finishing up one meeting while staging another. If you never want to hear the phrase “next slide, please” again, enable slide control. With slide control on, hosts share a slide deck in a meeting, then choose attendees who can control the slides. These selected users will see a notification banner informing them of their access and are able to advance or rewind slides, even though they’re not sharing their screen. Visit the Zoom support center for more details about using slide control. For scheduling meetings with customized settings, the Templates feature lets you save and quickly reuse those settings. For example, for team meetings you may prefer to allow users to join before host, but for committee meetings, you may prefer to use the waiting room feature. Or, set up a template for meetings you want to record automatically. Make and use templates by scheduling through the Zoom web portal. For detailed instructions, visit the Zoom support center. While videoconferencing has made it easy to connect with others at the click of a button, videoconferencing creates barriers for those who are deaf, hard of hearing, in noisy environments or struggle with understanding a language or accent during the meeting. Enabling live transcripts through Zoom is a best practice to make your meetings more accessible to live participants. Note that the transcript will be imperfect, will not meet the standards for an accommodation request and that you should not use a Zoom-generated transcript for final transcription or closed captioning. When you’re hosting, turning on captions is just two clicks away. As an attendee, when captions are enabled, you have options for viewing transcripts in subtitle mode or a transcript window. Visit UNC’s Digital Accessibility Office for more guidance on Zoom’s live transcripts. Recording your meeting not only helps those who weren’t able to attend, it also gives an opportunity for people to review content for better comprehension. Whether you’re recording locally or to the cloud, we recommend sharing and storing your recordings using UNC Panopto, the University’s centrally supported video storage and management system. Zoom cloud recordings are deleted from Zoom after 30 days, but they’re automatically backed up to Panopto. To locate your Zoom recordings in Panopto, first log in to UNC Panopto, select My Folder from the left menu and click on the Meeting Recordings folder. See the Zoom Cloud Recording Auto-Deletion Frequently Asked Questions for more guidance. These tips just scratch the surface of what you can do with Zoom. For more tips to become a pro, visit the Zoom Learning Center. The Learning Center offers on-demand learning, live webinars and badges to show off what you’ve learned. For questions specific to UNC-Chapel Hill or about teaching with Zoom and Panopto, visit ITS Educational Technology’s Zoom resources page. 1. Have fun
2. Customize your settings
3. Save time
4. Supercharge
5. Make it accessible
Learn more
Improve your Zoom with new features
In early 2020 when it felt like the world went remote overnight, most of us got a crash course in Zoom videoconferencing. And we’re still Zooming — in the past 12 months, UNC-Chapel Hill hosted more than 1.4 million Zoom meetings and included participants joining from more than 200 countries or territories!
Comments are closed.